Couple Things…

airport-sunnieswedding-cookietartan-tiebaby-m-kilt

We were a little early to the airport for our flight home from Scotland on Sunday afternoon so we tried on a million pairs of silly sunglasses.

We took home a cookie from the wedding for this girl – it had purple icing and a bow, she was the happiest!

Showing off the tartan tie we found in a shop in Stirling that my husband ended up wearing to the wedding (it just so happened to match the suit and shirt we brought, fun!)

In case you missed it on Instagram, we got baby M a cute/ridiculous onesie from Scotland as a souvenir.


Not many photos this week! We spent some time getting back into our weekly groove after our long weekend in Scotland. My husband kept claiming to have slight jet lag from the trip but I seemed to escape it. Or maybe it’s because I’m used to odd sleeping hours, or maybe it’s his new creative way of getting out of feeding M in the middle of the night – who knows. Anyway, I hope you have a great fall-y weekend – we’re picking pumpkins and going to an Oktoberfest!

The Most Beautiful Country in all the Land…

As I mentioned on Friday, we went to Scotland over the weekend! I know, not your normal destination for a long weekend but when 2 of your favorite people get married in Scotland and you have 2 small kids staying with their grandparents (1 very small kid), 4 days is all you really get. But they were an awesome 4 days so of course I wanted to share some photos here on the blog.

Scotland-2014-12

The weekend started with a bang when after an overnight flight to Glasgow, Scotland and an afternoon of touring the city I ended up sleeping for 10 HOURS STRAIGHT! I haven’t slept through the night in months, maybe a year? Ya know, pregnancy followed by infancy does not bode well for sleeping…

Scotland-2014-10

We started our first full day in Scotland with what else – a full Scottish breakfast!

Scotland-2014-9

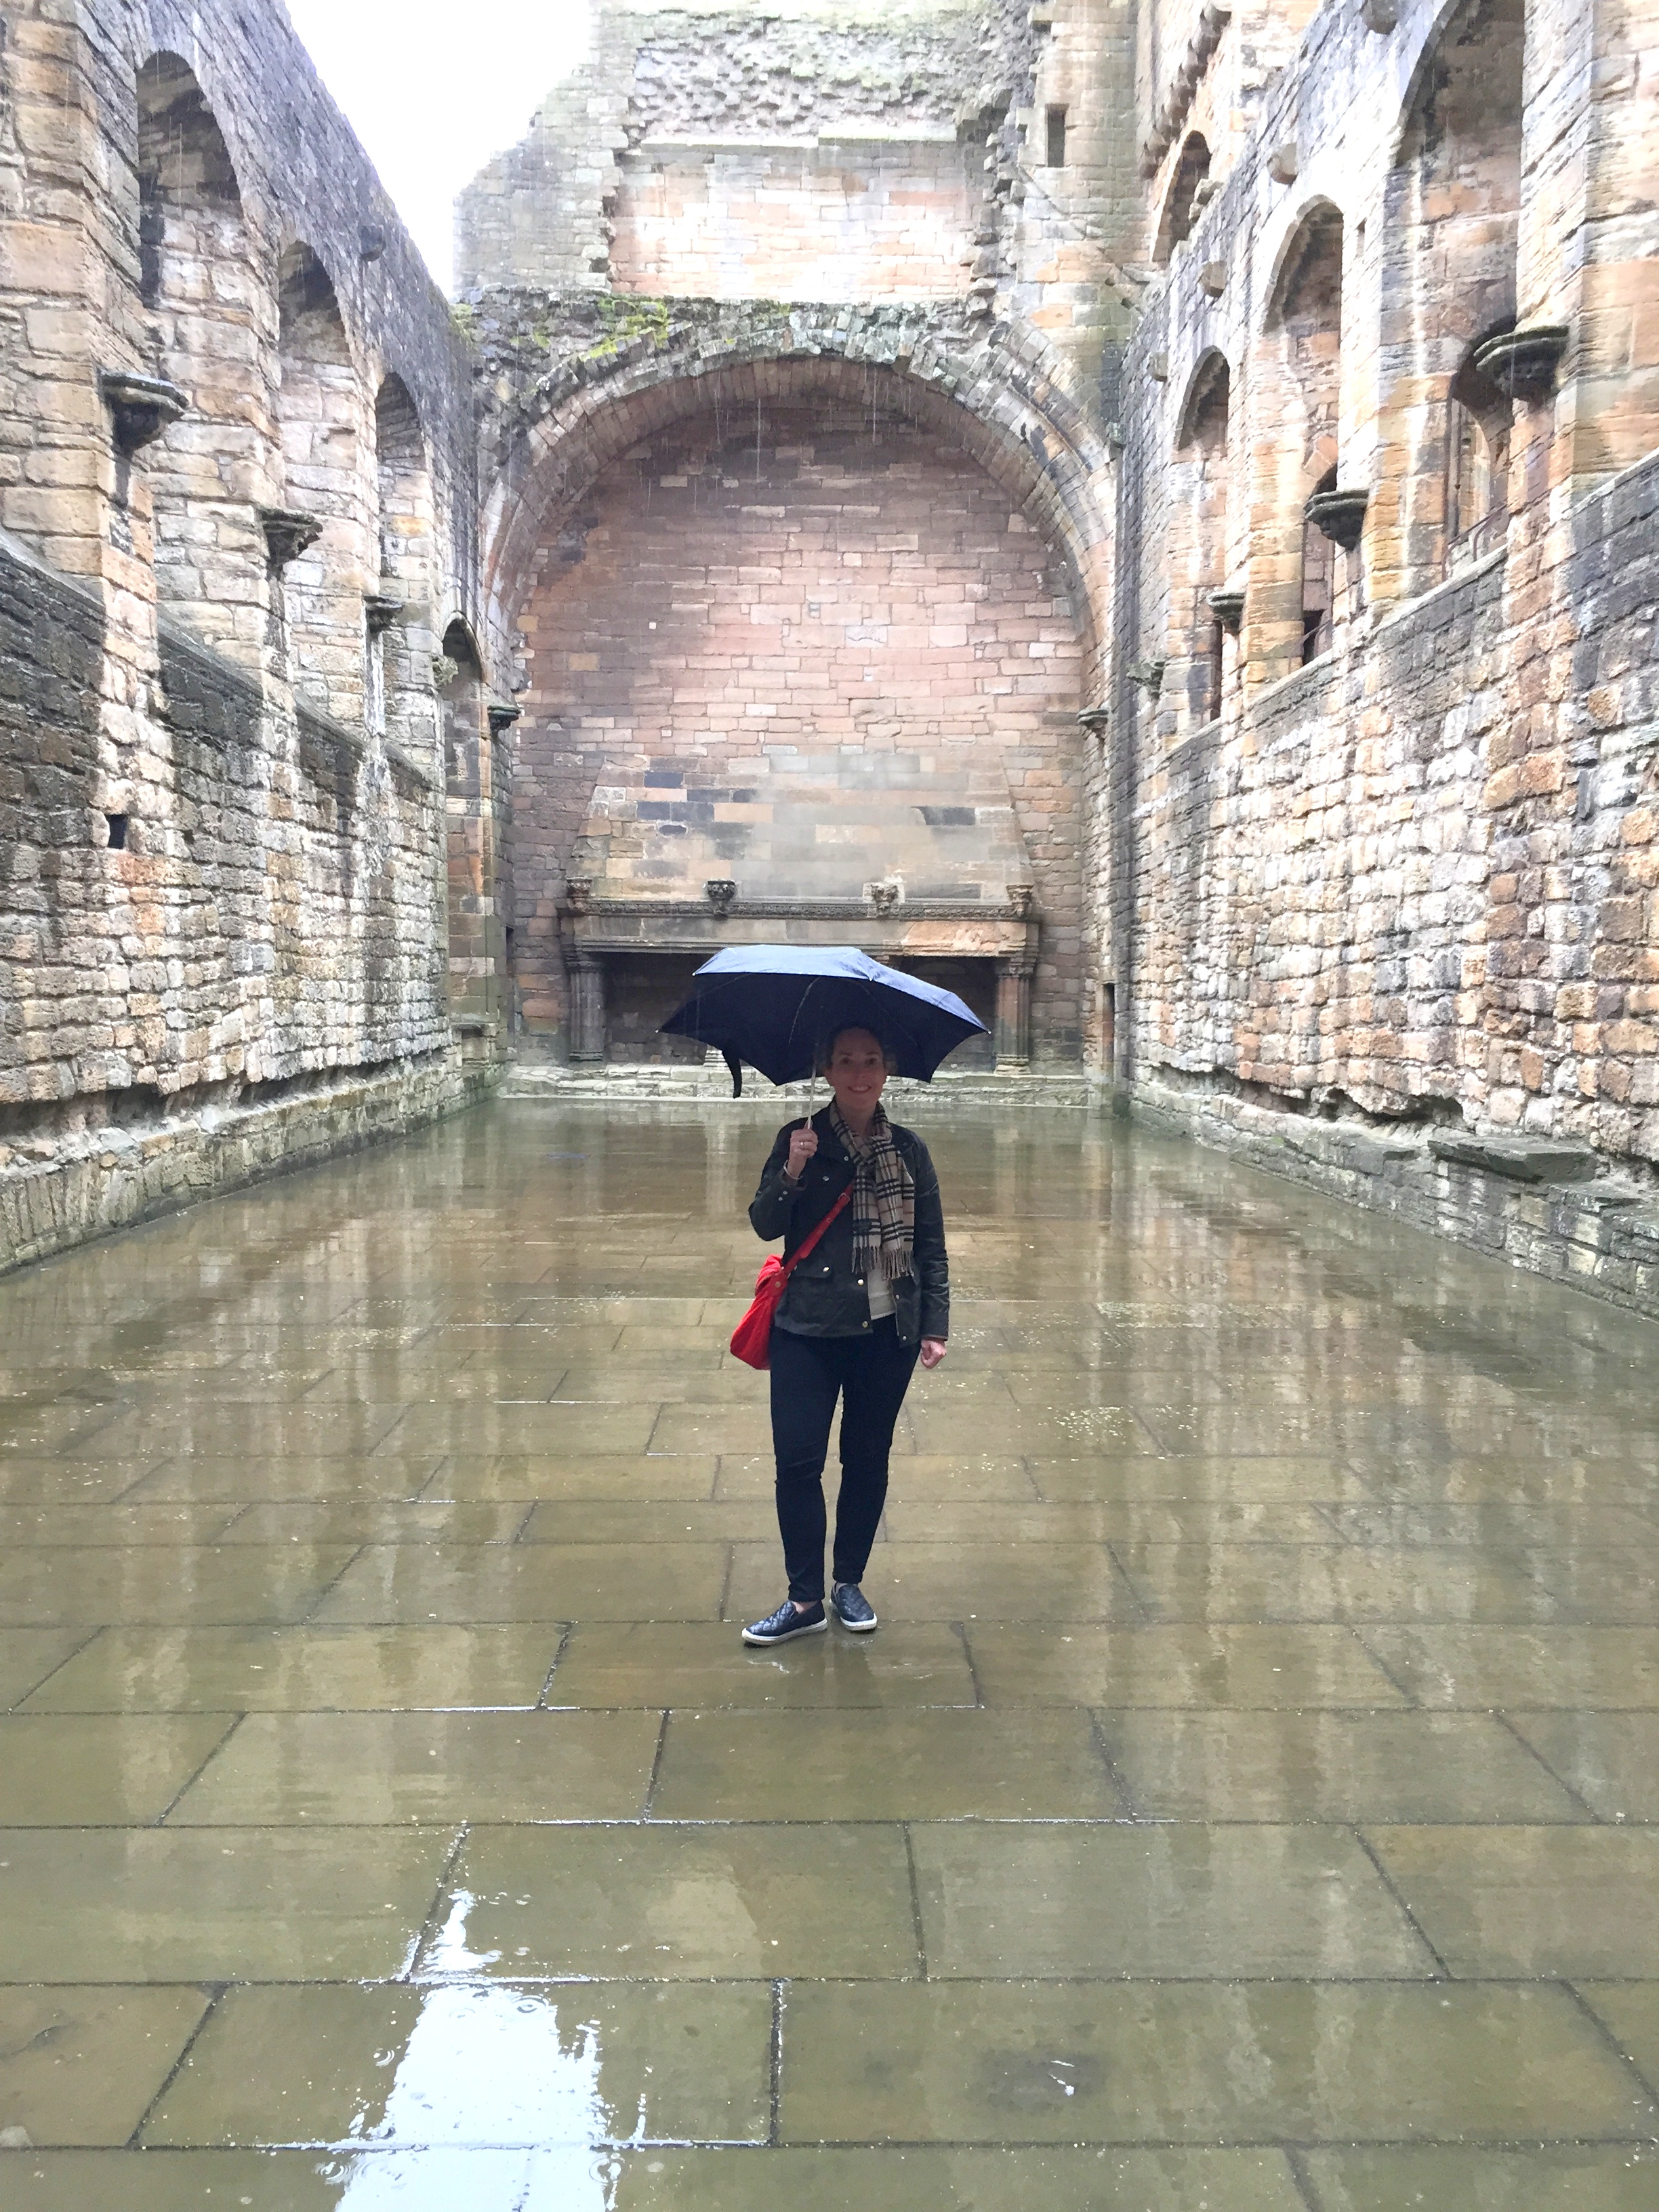
We decided to rent a car so that we’d have time to do some touristy things and see more of Scotland before the events of the wedding began. Friday we drove to tour Linlithgow Palace famed for being the castle where Mary Queen of Scots was born. It was amazing and HUGE! As with many castles in Scotland it was burned in a fire but the skeleton of the castle remains for us to see. In the first photo above I am standing in the Great Hall of the castle holding an umbrella because there isn’t a roof anymore. It was raining but just lightly and I always think a light rain is fitting for Scotland, no?

Scotland-2014-8

Then we drove to Stirling where the wedding would be, checked in, saw friends, and went to the rehearsal dinner – yum! The haggis app was actually spectacular. The next morning we had some time to kill before the ladies and I had blow-out appointments so my husband and I got back in the car and drove to the Wallace Monument commemorating William Wallace. It was lovely from the outside with incredible views of Stirling! Once inside you climb a narrow and steep staircase to the top with rooms on each floor you to pass through with historical information. Unfortunately I had a little claustrophobia set in and didn’t make the climb past the first floor, but my husband said the views from the top were great.

Scotland-2014-4

And then it was wedding time! We had a blast celebrating the couple in a traditional Scottish ceremony at the amazing Stirling Castle – I had to do a selfie with the view, although my fabulous blown-out/curly hair and beaded dress sort of took over the whole picture. Anyway, here are some highlights…

Scotland-2014-7

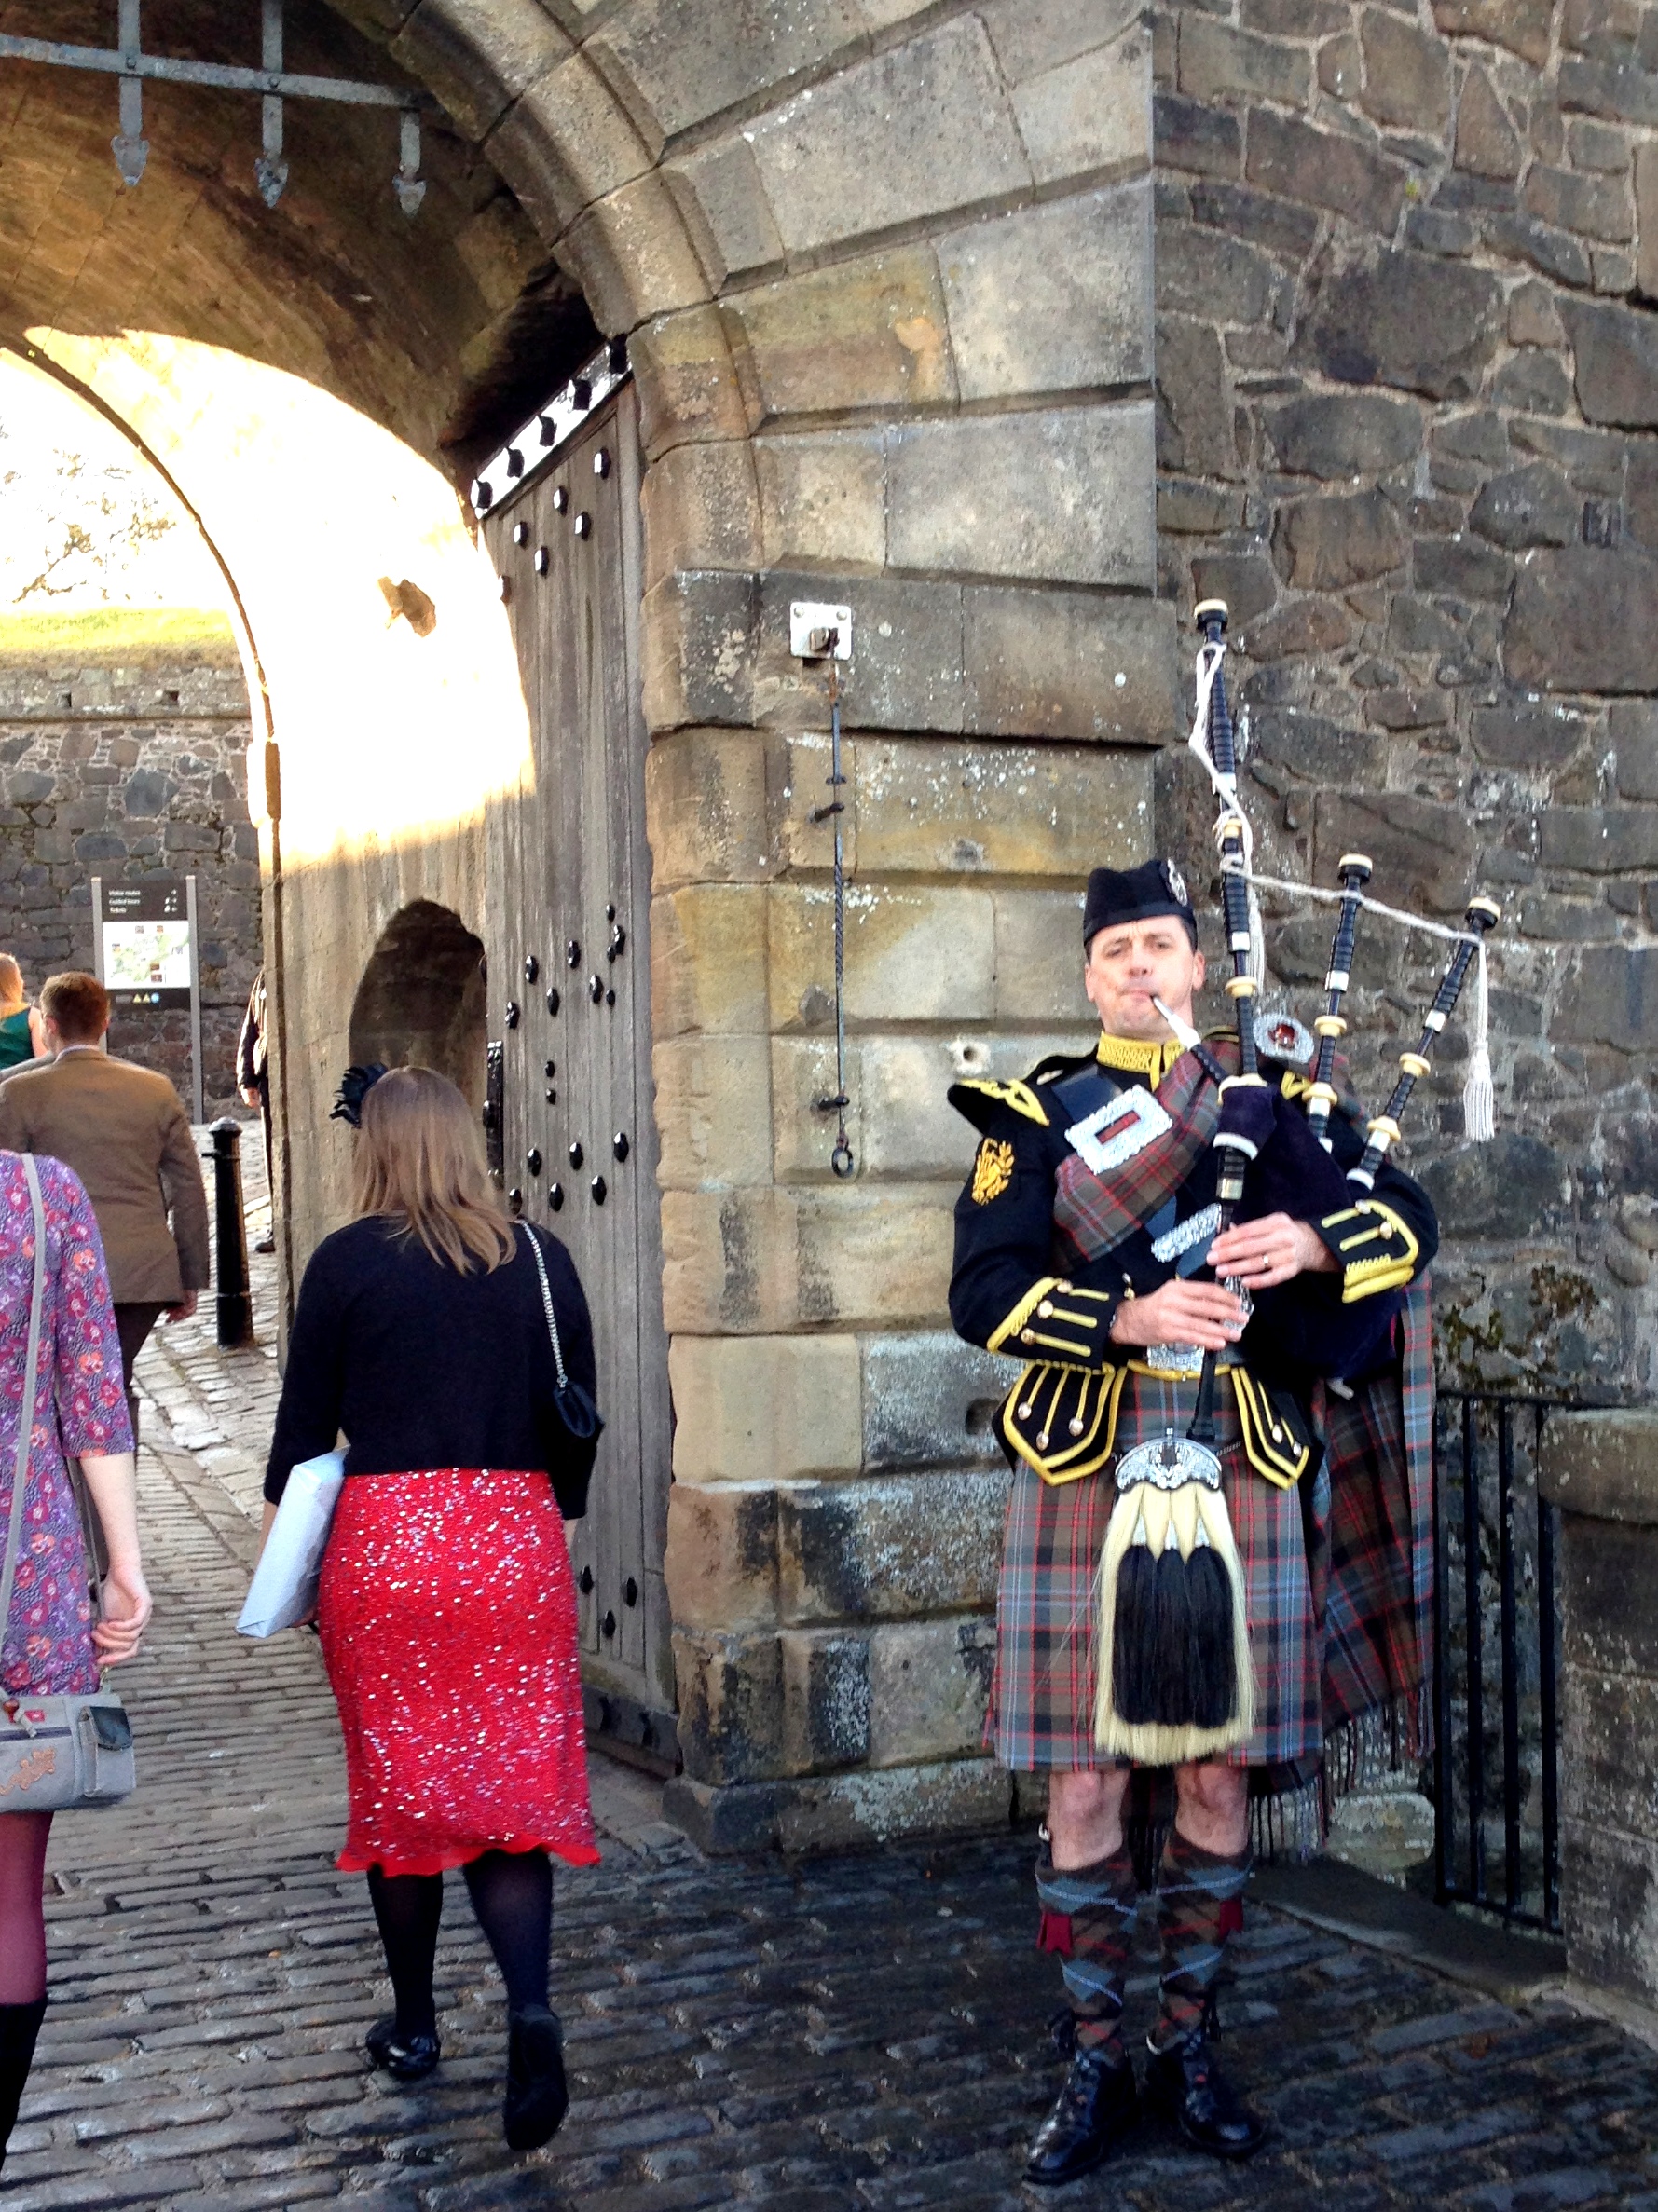
Being greeted by a bagpiper.

Scotland-2014-6

Drinking Scotch from a quaich during the ceremony.

Scotland-2014-1

Cocktail hour with armor.

Scotland-2014-3

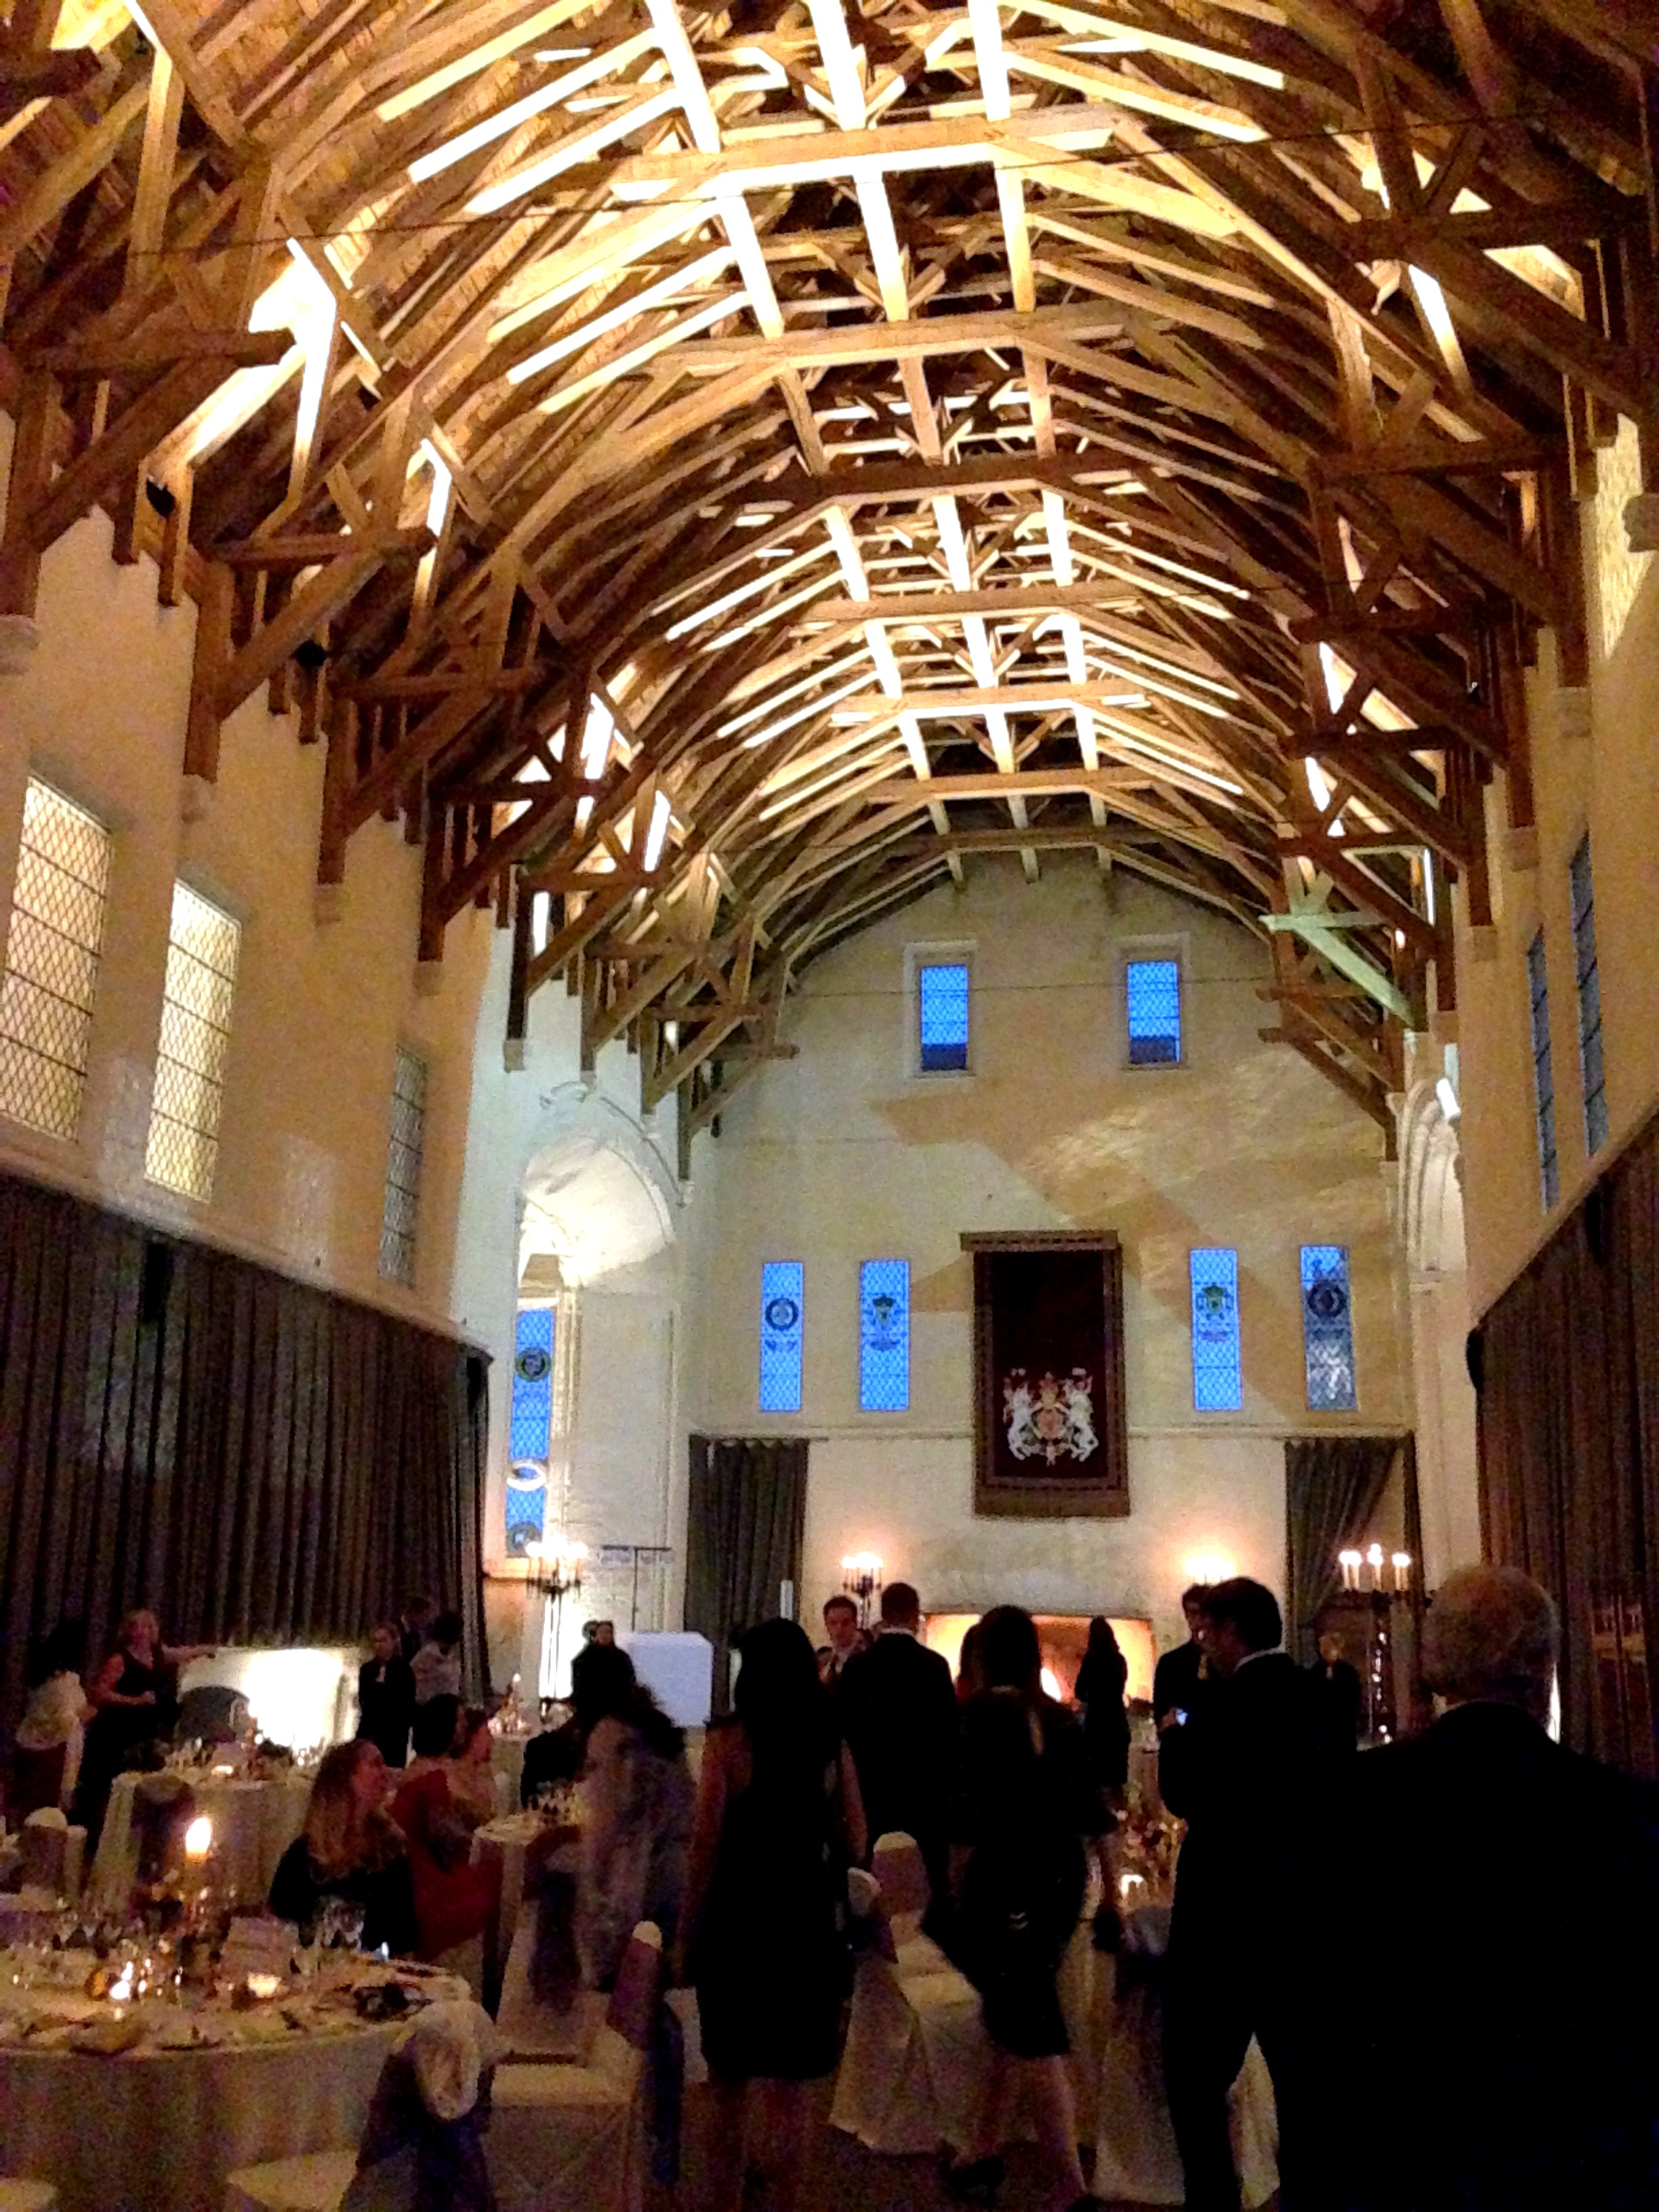
The Great Hall where the reception was held where the food was delish, the drinks flowed, and we danced for 4 hours straight – I was actually sore the next day!

Scotland-2014-11

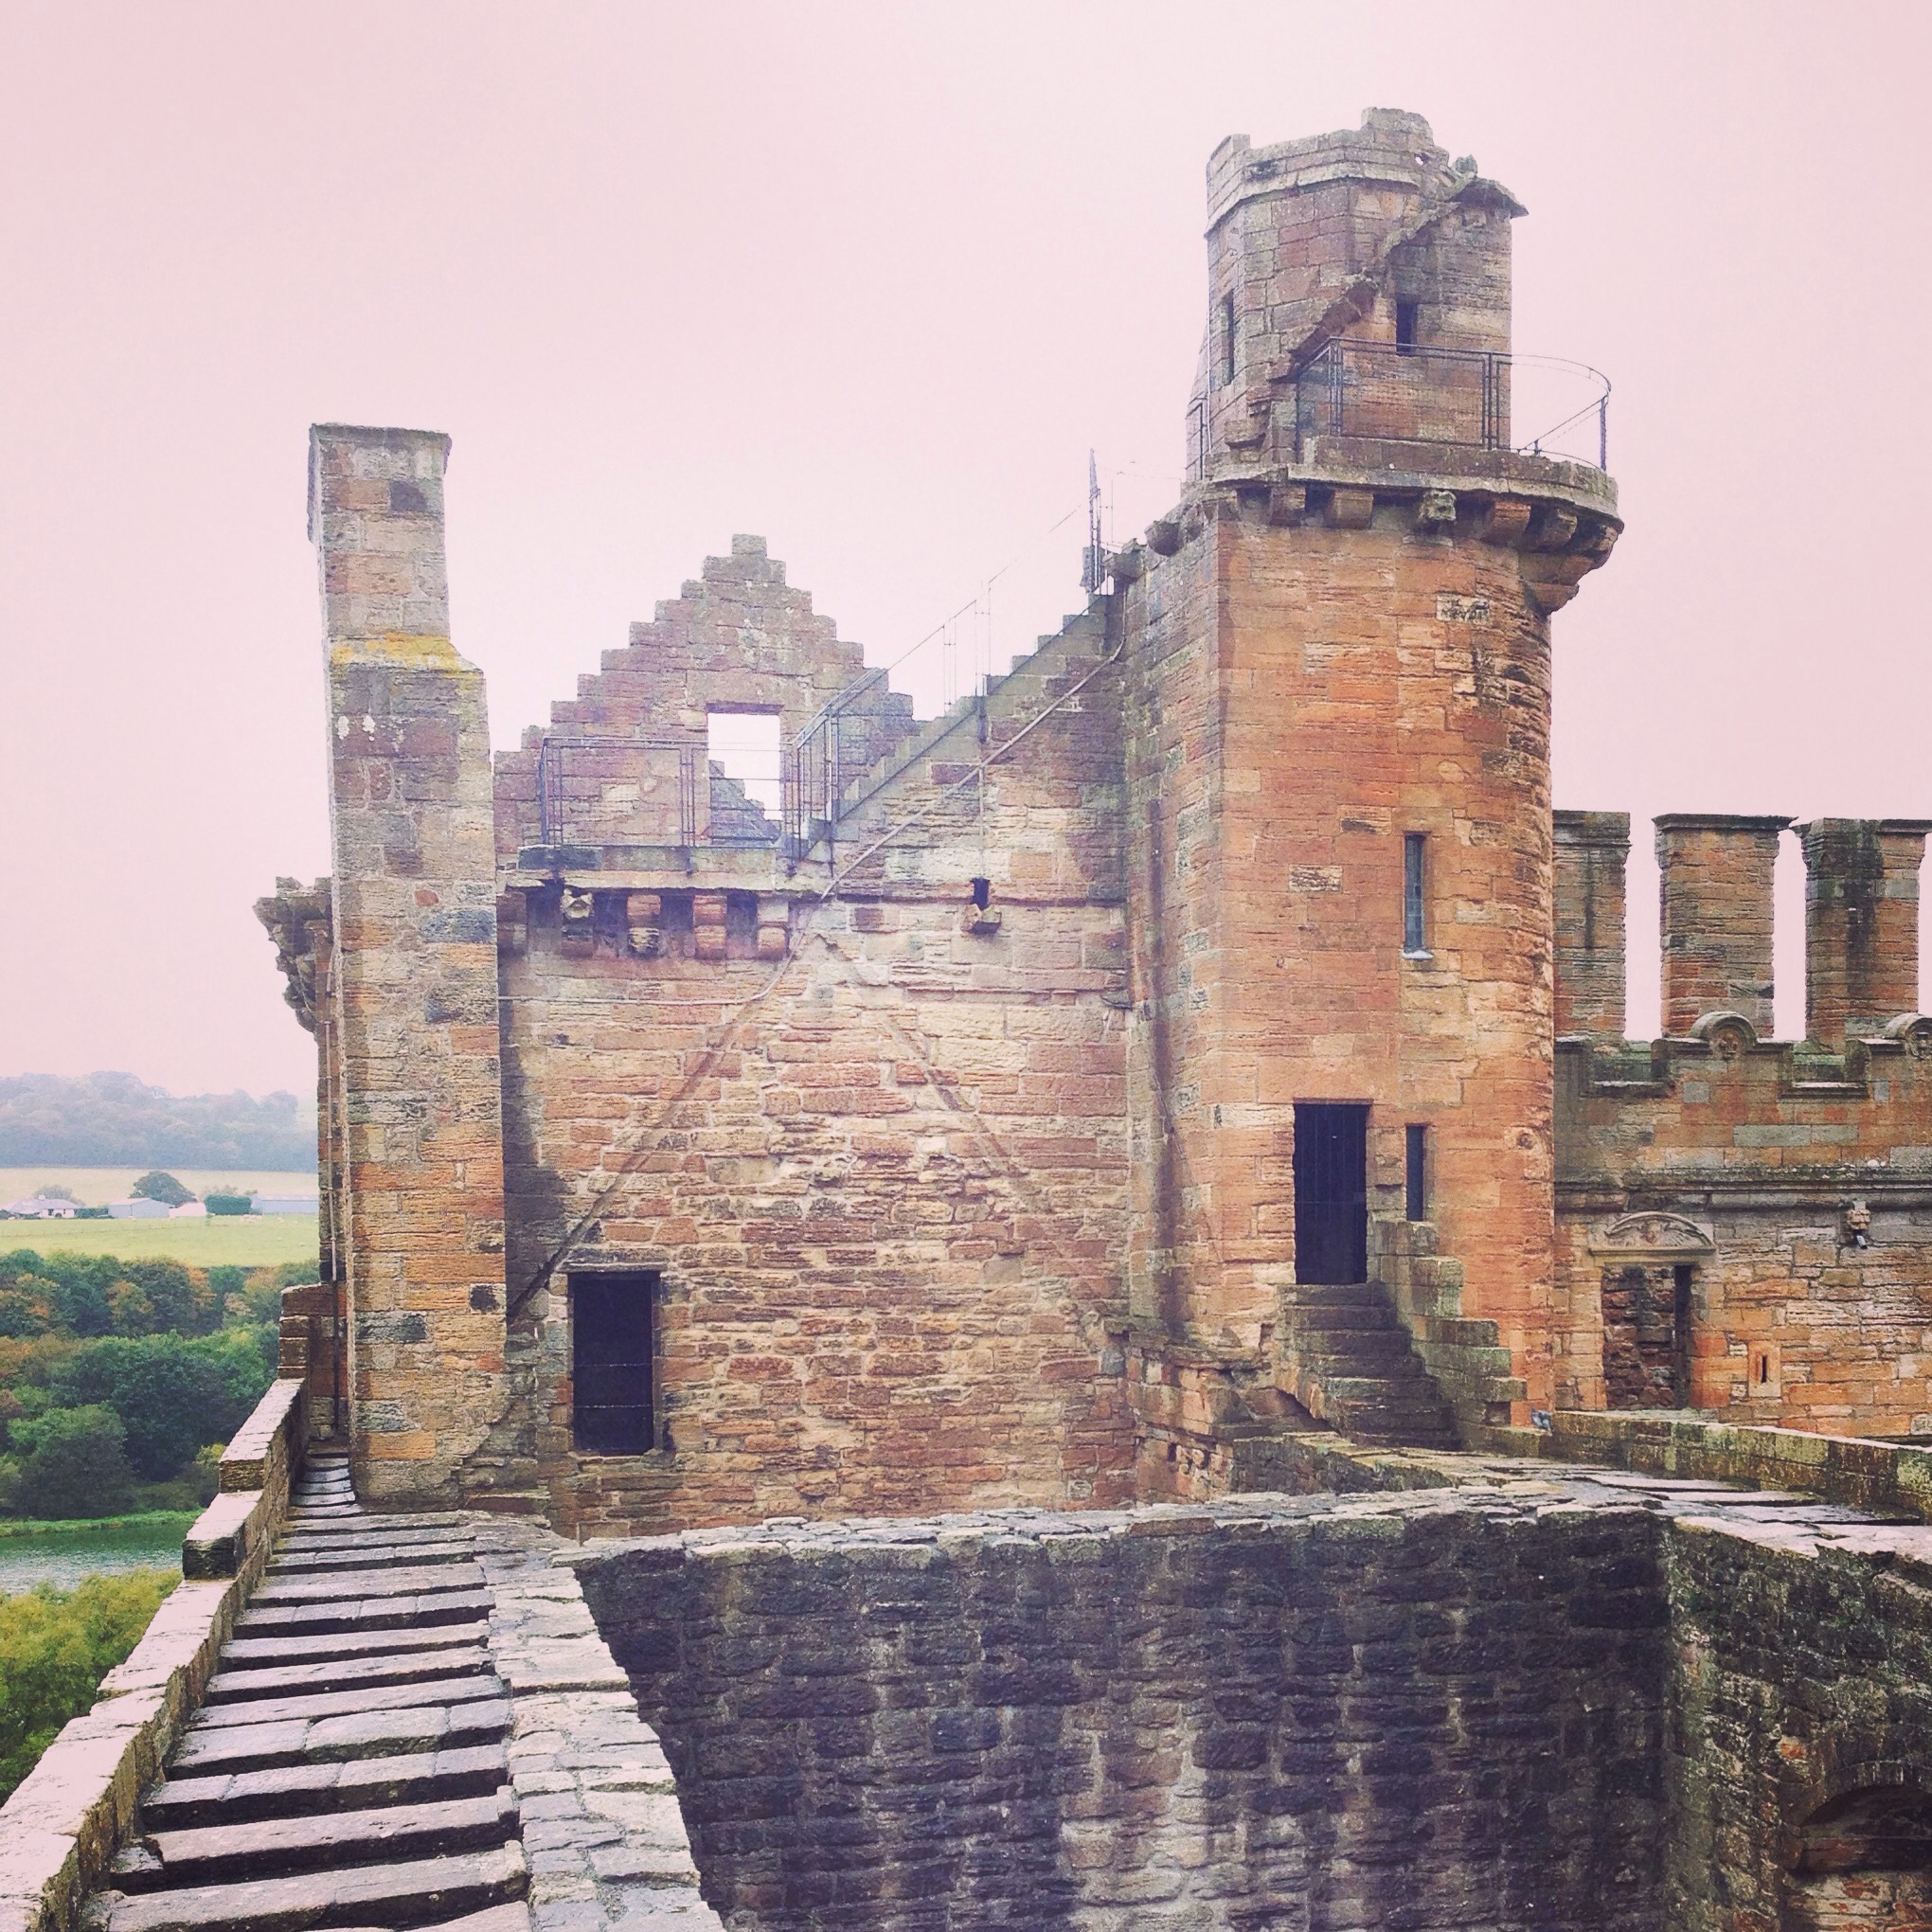
After one last castle visit Sunday afternoon to Bothwell Castle, we boarded our flight and came home. It was a whirlwind but such a blast, I literally can’t stop thinking about how much fun we had. Congrats to A&E and thank you so much for having us!

Ps. I certainly missed my babies but they had the time of their lives with their grandparents – we all came home happy and refreshed from our own travels but glad to be home.

Decoupage Class – Sign Up Now!

My decoupage Class is next Tuesday evening – SIGN UP TODAY!

decopauge-6

Decoupage—from the French word découper, meaning to cut out— is a fun and easy way to decorate just about any object. The process entails pasting varied shapes of paper to an object and then covering them with several coats of lacquer. The result is depth and patterns that look as though they are actually painted on the decoupaged object. Together we will create a  picture frame (approximately 4×6-inches) using a selection of colored papers. Once you learn this fun and easy way to decorate just about any object, you won’t be able to stop. Get a head start on your handmade holiday gifts! A $12 materials fee is payable to instructor at class.

For a full listing of all the classes I’m teaching this fall see this post.

Fall Breakfast Yogurt

I’m always on the hunt for new breakfast ideas that are healthy and filling. Since we had tons of apples from our apple picking adventure I thought about how good apples would be with Greek yogurt, right? Here’s what I threw together and have been eating now for a week – it’s the perfect combination of fall flavors. Try it, let me know what you think!

fall-breakfast-yogurt

Greek yogurt
Diced apples
Pistachios for crunch
Sprinkle of cinnamon
Drizzle of honey

Enjoy!

Cooking with a Toddler

cooking-with-kids-7

We are constantly cooking in our house and from a very early age we knew it was rubbing off on our Z. We put her tiny kitchen (we got the wood DUKTIG Play Kitchen one from Ikea, I highly recommend it) in our kitchen so we could all cook together at the same time. Well, I had been noticing the past year or so she wants to get in there and REALLY cook in the REAL kitchen. So, over time, I’ve pulled together some ideas of how your toddler can actually help you cook. It’s great when I start to cook and Z walks up and says “I help?” and I can actually respond with a list of things she can do to really help – after washing her hands first, of course!

 cooking-with-kids-3

Placing items onto a baking sheet or in a bowl after they’re chopped/cut. Especially in the fall/winter, we’re always baking and roasting. As I chop/cut, it’s the perfect task for your toddler to place your cut item onto the baking sheet or into a bowl.

Tossing pre-measured ingredients into the bowl or mixer. I measure the flour, she can pour it in! I measure the nutmeg, she tosses it in the bowl. This one can get messy but they feel really proud when they make in the bowl.

cooking-with-kids-1cooking-with-kids-2

Tossing in spices/herbs that don’t require measuring. We put dried parsley in a bunch of recipes and never measure it. So, Z’s job is to toss in the dried parsley, I tell her when to stop…and most of the time she does, but what’s an extra shake of dried parsley? Grinding pepper falls into this category too.

 cooking-with-kids-6

Using benign kitchen appliances. Do I let her use the knife to chop veggies? No. Do I let her use the rolling pin to give the dough an extra roll or 10? Yes. And she always feels awesome about it! But honestly, the lettuce spinner is her fave benign kitchen appliance – she could spin lettuce for HOURS!

 toddler-cooking

Hanging out with a snack. Sometimes “I help” really means, let’s hang out. And she gets to have a snack of whatever I’m making while I make it, not a bad gig!

How do you let your little one help in the kitchen?

Apple Galette

apple-galette-7

To continue on our post-apple picking baking adventures we made an Apple Galette over the weekend. And what is a galette, you ask? According to Wikipedia, the term galette is used to describe French round or freeform crust cakes. In layman’s terms a galette is a pie with no top baked flat instead of in a pie pan. So anyways, I read through a lot of recipes and I liked the sound of this one from Epicurious the best. We always seem to gravitate towards recipes with the least amount of ingredients.

apple-galette-1

First, peel and core about 6 apples and cut into small wedges. Mix with 2 Tbs sugar, 1 tsp lemon peel, and a dash of cinnamon.

apple-galette-2

Roll out your pie crust (we totally used a Pillsbury pre-maid crust) and spread a thin layer of apricot jam around the dough, leaving an inch and a half free.

apple-galette-3

Then, arrange your apples to cover the jam overlapping the apples a little. Fold the border of dough on top of the apples.

apple-galette-4

Brush with a little milk (or eggwash) and sprinkle with a dash of sugar, about 1 Tbs. Bake at 425 for 20 mins. Reduce the oven to 375 and cook for another 20-30 until the crust is brown.

 apple-galette-5

Cool, serve, enjoy!

Apple Chips

apple-chips-9

Apple chips. Baked Apple Slices. Whatever you call them – they. are. delicious!

apple-chips-5

If you’re like us, then you’ll go apple picking at least once this fall and find yourself with a large amount of apples. I love to eat them as is but we were searching for a way to use our freshly picked apples above and beyond the standard pie and crisp. We love our mandolin so we thought we’d try making our own apple chips and boy did they come out great. It’s a bit of work to mandolin all your apples and then bake for 2 hours in batches, but the results are just so yummy I think it’s totally worth it.

apple-chips-1

Slice your apples with the 1/8″ size on your mandolin and place on a parchment paper or Silpat lined cookie sheet.

apple-chips-2

Remove any actual seeds but you don’t need to remove the core.

apple-chips-4

Sprinkle with a little cinnamon sugar mixture (for 6 apples we used 2 Tbs sugar and 1 Tsp cinnamon).

Then bake at 225 degrees for 2 hours or more until they get crunchy. A few notes:
– You’ll want to use an “eating” apple for these like a Honey Crisp rather than a “baking” apple like Macintosh.
– We fit 3 cut apples on 2 baking sheets.
– 2 baking sheets don’t fit side by side in my oven so each sheet was on a different rack. To make sure the apple chips baked evenly, we rotated the baking sheets halfway through baking at 1 hour.
– You can use your own judgement on how much cinnamon sugar to add, or don’t use any at all!
– We used one baking sheet with a silpat and one with parchment paper and I would say the apples baked on parchment paper came out slightly better.

apple-chips-6

Enjoy!

Tomato Sauce from Scratch

Every year around this time we find ourselves with an overabundance of tomatoes. We grow our own AND we belong to a CSA where we get pounds of tomatoes each week. We eat them in every way imaginable but this year we decided to take the plunge and make something with them we’ve been thinking about making for years….tomato sauce. And you know what? It wasn’t as hard as we thought! Sure, it was hours of work for not much yield (in quantity) but the sauce was quite yummy and seemingly extra sweet due to the fresh tomatoes. We made our sauce with about a dozen saladette tomatoes (plum tomatoes), 4 or 5 regular tomatoes, and a handful of cherry tomatoes because I had some leftover from last week. We went through the process of prepping the tomatoes (see below) and then used our trusty marinara recipe that we always use for our sauce.

tomato-sauce-from-scratch

Start by coring the tomato and then cutting and X on the bottom (so it doesn’t burst in the next step).

tomato-sauce-from-scratch-2

Drop a few of your tomatoes into boiling water and let boil for 60 to 90 seconds.

tomato-sauce-from-scratch-3

Take the tomatoes out and put right into a bowl of ice water. Once the tomatoes are cool enough to handle, peel them. The skins will come right off. We then blended about 3/4 of the tomatoes and chopped the rest so there would be some tecture and chunkiness to our sauce. Then we used these tomatoes as we do the canned tomatoes from this recipe.


To answer the questions I know you’ll ask:

Did I notice a difference between using canned tomatoes vs. fresh? Definitely. The sauce was sweeter for one thing and a lot more liquid-y so we left it to cook down longer on the stove. You could also taste a freshness to the sauce, if that makes sense.

Was it all worth the extra effort? Ummm, maybe not. We really appreciate the invention of canning after this experience, ha! The sauce was great but it was a lot of work to prep the tomatoes and after using a small amount of sauce to make a healthy eggplant parm we were left with enough for just one other use.

Do you have tons of tomatoes this time of year? Let me know if you make your own tomato sauce from scratch!